

Setting up a WHMCS staging environment isn't just a best practice—it's your safety net against costly mistakes. After helping dozens of hosting companies deploy secure testing environments, I've learned that the 30 minutes you invest in proper setup can save you from hours of production downtime and angry customers.
🚀 Get WHMCS Development LicenseWhy You NEED a WHMCS Staging Environment (Real-World Horror Stories)
Let me tell you about Mike—a hosting provider who learned the hard way. He updated WHMCS directly on his production server at 2 PM on a Tuesday. Within 15 minutes, his custom payment gateway module broke, causing checkout failures for over 200 customers. By the time he rolled back the changes, he'd lost approximately $12,000 in sales and spent the next week rebuilding customer trust.
This scenario repeats itself weekly across the hosting industry. But here's the thing: it's completely avoidable.
💡 What You'll Learn in This Guide
- How to obtain and configure a development license (including the free option)
- Step-by-step staging environment setup with cPanel and command-line methods
- Database cloning strategies that protect sensitive customer data
- Security configurations to prevent accidental customer charges
- Testing workflows that catch issues before they reach production
- One-click deployment strategies for seamless updates
What is a WHMCS Staging Environment?
A WHMCS staging environment is an exact replica of your production WHMCS installation—but completely isolated. Think of it as a parallel universe where you can break things, test updates, and experiment with customizations without any risk to your live business.
Risk-Free Testing
Test version upgrades, module installations, and theme changes without touching your live system.
Real Data Testing
Use actual production data to catch edge cases and compatibility issues before they affect customers.
Faster Development
Build and test custom modules, templates, and integrations in a controlled environment.
Client Approval
Show stakeholders changes in a live-like environment before deploying to production.
WHMCS Staging Environment Overview & Requirements
| Component | Requirement | Notes |
|---|---|---|
| Development License | Free with paid license or purchase separately | Required for staging environment to function |
| Server Environment | Identical to production specs | Same PHP version, MySQL version, extensions |
| PHP Version | 8.1, 8.2, or 8.3 (2026 recommended) | Must match production for accurate testing |
| MySQL/MariaDB | 5.7+ / 10.3+ | Separate database for staging data |
| Disk Space | 2x production installation size | Account for files + database duplicate |
| Access Control | Password protection or IP restriction | Required for development license compliance |
| Estimated Setup Time | 30-60 minutes | Depends on installation size and method |
⚠️ Critical Requirement: License Compliance
Your staging environment must be password-protected or return a “Forbidden” error when accessed publicly. WHMCS enforces this requirement for development licenses. Use cPanel's Directory Privacy feature, .htaccess authentication, or IP whitelisting to comply.
Step-by-Step: Setting Up Your WHMCS Staging Environment
Step 1: Get Your Development License
Option A: Free Development License (If You Own a Direct License)
If you purchased your WHMCS license directly from WHMCS.com, you're entitled to one free development license per active production license. Business license holders get up to three free development licenses.
How to Request:
- Log in to your WHMCS account at https://www.whmcs.com/members/
- Navigate to Support → Submit a Ticket
- Select “Licensing” as the department
- Request a development license for your production license key
- Provide the domain, IP address, and directory path for your staging environment
Typical Response Time: 24-48 hours
Option B: Purchase a Development License (Reseller Customers)
If you purchased WHMCS through a reseller (like your hosting provider), you'll need to purchase a development license separately. Prices typically range from $15-25/month depending on your reseller.
Important: The development license must be tied to a specific domain, IP address, and directory path. Have this information ready before purchasing.

Directory Privacy configuration in cPanel – Required for development license compliance
Step 2: Prepare Your Server Environment
Your staging environment should mirror your production setup as closely as possible. This ensures that what works in staging will work identically in production.
✓ Environment Checklist
- Same PHP version: Check with
php -von command line - Identical PHP extensions: ionCube Loader, mbstring, mysqli, curl, GD, etc.
- Matching MySQL/MariaDB version: Use
mysql --versionto verify - Same server software: Apache or NGINX with identical configuration
- Sufficient disk space: At least 2x your current WHMCS installation size
Step 3: Duplicate Your WHMCS Installation Files
Method A: Using cPanel File Manager (Easiest for Most Users)
Access cPanel File Manager
Log in to your cPanel account and navigate to Files → File Manager. Locate your production WHMCS directory (commonly public_html/whmcs or public_html/billing).
Copy the WHMCS Folder
Right-click on your WHMCS folder and select Copy. In the destination field, enter the new staging directory path (e.g., public_html/whmcs-staging).
Pro Tip: Use a subdomain for cleaner URLs, like staging.yourdomain.com instead of yourdomain.com/whmcs-staging.
Wait for Copy Completion
Depending on your installation size, this can take 5-15 minutes. You'll see a progress indicator in cPanel. Don't navigate away until it completes.
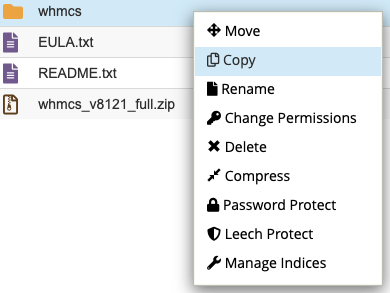
Using cPanel File Manager to copy your WHMCS installation
Method B: Using SSH/Command Line (For Advanced Users)
# SSH into your server
ssh username@yourserver.com

# Navigate to your web root
cd /home/username/public_html

# Copy entire WHMCS directory
cp -R whmcs whmcs-staging

# Set proper permissions
chmod -R 755 whmcs-staging
chown -R username:username whmcs-staging
Watch: Complete WHMCS Staging Setup with One-Click Deployment (28:08)
Step 4: Duplicate Your Database
This is where many people make mistakes. You need to create a completely separate database and import your production data—never point staging directly at your production database.
Using cPanel MySQL Databases
Create a New Database
In cPanel, go to Databases → MySQL Databases. Create a new database with a descriptive name like username_whmcs_staging.
Create a Database User
Scroll down to “Add New User” and create a new database user (e.g., username_staging) with a strong password. Save these credentials—you'll need them shortly.
Assign User to Database
In the “Add User to Database” section, select your new user and new database, then click “Add”. Grant ALL PRIVILEGES when prompted.
Export Production Database
Open phpMyAdmin from cPanel. Select your production WHMCS database, click the Export tab, choose “Quick” export method, and select “SQL” format. Click Go to download the .sql file.
Import to Staging Database
In phpMyAdmin, select your new staging database, click the Import tab, choose your downloaded .sql file, and click Go. This may take several minutes for large databases.
⚠️ Large Database Warning
If your database export is larger than your server's upload limit (typically 128MB-256MB), you'll need to use command-line tools instead:
# Export production database
mysqldump -u username -p production_db > whmcs_backup.sql

# Import to staging database
mysql -u username -p staging_db < whmcs_backup.sql
Step 5: Update Configuration Files
Now you need to tell your staging installation to use the new database instead of the production one.
Edit configuration.php
In your staging WHMCS directory, locate and open configuration.php using cPanel File Manager's editor or a text editor via FTP.
Find these lines and update them:
$db_host = "localhost";
$db_name = "username_whmcs_staging";  // Your new staging database
$db_username = "username_staging";    // Your new database user
$db_password = "your_staging_password";
Modify the Encryption Hash (Critical Security Step)
This step prevents your staging environment from decrypting production credit card data and accidentally charging real customers. Find the line:
$cc_encryption_hash = "original_hash_value";Add extra characters to invalidate it:
$cc_encryption_hash = "original_hash_value_STAGING_DISABLED";What this does: Makes WHMCS unable to decrypt stored payment information, ensuring you can't accidentally process real transactions in staging.
🚨 CRITICAL: Never Reverse This on Production!
If you accidentally modify the encryption hash in your production configuration.php, you'll permanently lose access to all encrypted customer data (credit cards, passwords, API keys). Always double-check you're editing the staging file.
Step 6: Update the System URL in Database
WHMCS stores its base URL in the database. You need to update this to point to your staging location, or links and redirects won't work correctly.
Option A: Via WHMCS Admin Interface (After Access)
Once your staging site is accessible, log in to the admin area and navigate to:
Configuration → System Settings → General Settings → General Tab
Update the WHMCS System URL field to your staging URL (e.g., https://staging.yourdomain.com/).
Option B: Via Direct Database Query (Before Access)
If you can't access the staging admin yet, run this SQL query in phpMyAdmin:
UPDATE `tblconfiguration`
SET value = 'https://staging.yourdomain.com/'
WHERE setting = 'SystemURL';
For WHMCS 8.8+, you can also set this in configuration.php:
$systemUrl = "https://staging.yourdomain.com/";Step 7: Password Protect the Staging Directory
This is mandatory for development license compliance. WHMCS requires that development installations are not publicly accessible.
Using cPanel Directory Privacy
Access Directory Privacy
In cPanel, navigate to Files → Directory Privacy. Locate and click on your staging directory.
Enable Password Protection
Check the box for “Password protect this directory” and give it a name like “WHMCS Staging – Authorized Access Only”.
Create Authorized Users
Add usernames and passwords for team members who need access. Each person can have their own credentials for audit trail purposes.
Alternative: IP-Based Restriction via .htaccess
If you have a static IP address, you can restrict access by IP instead:
# Create/edit .htaccess in your staging directory
Order Deny,Allow
Deny from all
Allow from 203.0.113.45  # Your office IP
Allow from 198.51.100.67 # Your home IP
Allow from 192.0.2.10 # VPN IPStep 8: Disable Email Sending (Prevent Customer Spam)
You absolutely do not want your staging environment sending real emails to customers. Imagine testing an invoice generation feature and accidentally spamming 5,000 customers with duplicate invoices at 3 AM. It happens more often than you'd think.
Method 1: WHMCS Built-In Setting (Recommended)
Log in to your staging admin area and navigate to:
Configuration → System Settings → General Settings → Mail Tab
Set Disable Email Sending to ON.
✓ What this does: Completely disables all outgoing email from WHMCS, including automated invoices, welcome emails, support ticket notifications, and payment reminders.
Method 2: Use Mailtrap.io for Email Testing
If you actually need to test email functionality (templates, formatting, etc.), use a service like Mailtrap.io. It captures all outgoing emails without delivering them to real recipients.
Mailtrap Configuration for WHMCS
In WHMCS staging, go to Configuration → System Settings → General Settings → Mail Tab and configure:
- Mail Provider: SMTP
- SMTP Hostname: smtp.mailtrap.io
- SMTP Port: 587 or 2525
- SMTP Username: [Your Mailtrap username]
- SMTP Password: [Your Mailtrap password]
- SMTP Encryption: TLS
Now all emails are captured in your Mailtrap inbox for review—but never delivered to real customers.
Step 9: Configure Payment Gateways for Test Mode
Even with the encryption hash modified, you should explicitly set all payment gateways to test mode to prevent any possibility of processing real transactions.
PayPal Test Mode
In Configuration → System Settings → Payment Gateways, select PayPal and check the “Sandbox Mode” or “Test Mode” option. Update API credentials to PayPal Sandbox credentials.
Stripe Test Mode
Replace live API keys with Stripe test keys (starting with pk_test_ and sk_test_). All test transactions will be visible in your Stripe Dashboard under “Test mode”.
Other Gateways
For gateways like Authorize.Net, 2Checkout, or Braintree, consult their documentation for test mode settings. Most have sandbox environments specifically for this purpose.
Alternative: Disable All Gateways
If you're not specifically testing payment processing, simply deactivate all payment gateways in staging. This guarantees no transactions can be processed.
Step 10: Verify Staging Environment Functionality
Before declaring victory, you need to thoroughly test your staging environment to ensure it's working correctly—and safely isolated from production.
1. Test Admin Login
Navigate to https://staging.yourdomain.com/admin and log in with your production credentials. You should see the staging dashboard.
2. Test Client Area
Access the client area and verify that customer data is visible. Test navigation, product lists, and account details.
3. Place Test Orders
Go through the complete order process with a test product. Verify that no emails are sent and no real payment is processed.
4. Check System Health
Navigate to Configuration → System Health and address any warnings or errors specific to the staging environment.
✓ Staging Environment Health Checklist
- Admin area loads without errors
- Client area displays customer data correctly
- No emails being sent to real customers
- Payment gateways in test mode or disabled
- Cron jobs pointing to staging (not production)
- Directory password protection active
- System URL configured correctly
- All customizations and modules present
Testing Workflows: How to Actually Use Your Staging Environment
Now that you have a functional staging environment, here's how to use it effectively for different scenarios.
Workflow 1: Testing WHMCS Version Upgrades
Refresh Staging Data
Before testing an upgrade, sync your staging database with the latest production data to ensure accurate testing. Export production DB → Import to staging.
Run the WHMCS Automatic Updater
In staging admin, go to Configuration → System Updates and run the automatic updater. This is the same process you'll use in production.
Test Core Functionality
After upgrade completes, systematically test:
- Admin dashboard and navigation
- Client area login and account management
- Order placement for each product type
- Invoice generation and payment processing
- Support ticket creation and management
- Automated provisioning for test products
Test Custom Modules and Integrations
This is where problems usually surface. Test every custom module, third-party addon, and integration you use. Check the Activity Log for errors.
Monitor Cron Job Results
Manually trigger the cron job in staging (php -f /path/to/staging/crons/cron.php) and review the output for errors or warnings.
Document Issues and Fixes
Create a checklist of any issues encountered and their solutions. This becomes your upgrade playbook for production.
Workflow 2: Developing Custom Modules
Staging environments are perfect for module development because you can test with real production data without risk.
- Develop locally or in staging: Write your custom module code in the staging
/modules/directory - Test with real data: Use actual customer records, products, and transactions to verify functionality
- Debug errors safely: Enable debug mode in staging without exposing errors to real customers
- Validate database changes: Test any database migrations or schema changes your module requires
- Peer review: Have team members test the module in staging before production deployment
Workflow 3: Testing Theme Customizations
Template changes can have unexpected effects on functionality. Always test in staging:
- Upload new theme files to
/templates/in staging - Activate the theme and test all client area pages
- Verify mobile responsiveness across devices
- Test order forms with different product configurations
- Validate all AJAX functionality and form submissions
- Check for JavaScript errors in browser console
Advanced Tips: Syncing Changes from Staging to Production
Manual Deployment Process
Once you've tested changes in staging and confirmed everything works, here's how to deploy to production safely:
Enable Maintenance Mode
In production, create a file named maintenance.html in your WHMCS root directory. WHMCS will automatically display this page to visitors while you work.
Backup Production
Create a complete backup of your production files and database before making any changes. Use cPanel Backup or command-line tools.
Deploy File Changes
Upload modified files from staging to production via FTP, SCP, or file manager. Only transfer files you've actually changed—not the entire installation.
Apply Database Changes
If your changes involved database modifications, carefully export only the changed tables or run specific SQL queries in production. Never import the entire staging database to production.
Test and Verify
Test critical functionality in production to ensure deployment succeeded. Check admin dashboard, client area, and any modified features.
Disable Maintenance Mode
Delete the maintenance.html file to restore normal operation. Monitor logs and error reports for the next few hours.
Automated Deployment with Git (Advanced)
Power users can set up Git-based version control for automated deployments:
# Initialize Git in staging
cd /path/to/staging/whmcs
git init
git add .
git commit -m "Initial staging setup"

# Set up Git remote for production
git remote add production user@production-server:/path/to/whmcs

# Deploy changes
git push production master

# On production server, pull changes
cd /path/to/whmcs
git pull origin master
⚠️ Warning: Never Track configuration.php in Git
Add configuration.php to your .gitignore file to prevent accidentally committing database credentials and encryption hashes to version control.
Common Mistakes and How to Avoid Them
Top 7 Staging Setup Mistakes
- Using the production database: Always create a separate staging database. Pointing staging at production can corrupt live data.
- Not modifying the encryption hash: Without this, staging can decrypt and charge real credit cards.
- Forgetting to disable email sending: Results in customers receiving test emails and duplicate communications.
- Not password-protecting the directory: Violates development license terms and could expose sensitive test data.
- Testing with outdated data: Refresh staging data regularly to catch edge cases with current customer records.
- Not testing cron jobs: Automated tasks may behave differently in staging if not configured properly.
- Skipping mobile testing: Theme changes often break mobile layouts—always test responsive design in staging.
Best Practices to Follow
- Refresh staging data before major tests: Export production DB monthly or before testing critical changes.
- Document your staging workflow: Create a checklist for team members to follow when using staging.
- Use subdomain for cleaner URLs:
staging.domain.comis better thandomain.com/staging. - Set calendar reminders: Schedule quarterly staging environment reviews to keep it in sync with production.
- Test with multiple browsers: Chrome, Firefox, Safari, and Edge can all render differently.
- Keep staging updated: When you update production WHMCS, update staging too to maintain parity.
- Use test payment credentials: Keep a document with all test gateway credentials for quick access.
Troubleshooting Common Staging Environment Issues
Issue 1: “License Invalid” Error After Setup
Cause: Development license is tied to specific domain, IP, or directory path.
Solution:
- Verify your staging URL exactly matches what you provided to WHMCS support
- Check that you're accessing staging via the registered domain (not IP address)
- Ensure directory path matches (e.g., if registered as
/whmcs-staging, don't use/staging) - If moved, contact WHMCS support to reissue the license for the new location
Issue 2: Staging Site Sending Real Emails
Cause: Email sending not disabled in General Settings.
Solution:
- Navigate to Configuration → System Settings → General Settings → Mail Tab
- Set Disable Email Sending to ON
- Alternatively, configure Mailtrap.io to capture all outgoing mail
- Test by triggering an invoice email and confirming it's not delivered
Issue 3: Payment Gateway Processes Real Transaction
Cause: Gateway still configured for live mode or encryption hash not modified.
Solution:
- Verify encryption hash in
configuration.phphas been modified with extra characters - Double-check all payment gateways are in test mode
- Replace all live API keys with sandbox/test credentials
- Consider temporarily deactivating all gateways if not testing payments
Issue 4: Database Connection Errors
Cause: Incorrect database credentials in configuration.php.
Solution:
- Open
configuration.phpand verify$db_name,$db_username, and$db_password - Test database connection in phpMyAdmin using the staging credentials
- Ensure database user has ALL PRIVILEGES on the staging database
- Check for typos in database hostname (usually
localhost)
Issue 5: Custom Modules Not Working in Staging
Cause: Modules may have hardcoded production URLs or dependencies.
Solution:
- Review module code for hardcoded production URLs and replace with dynamic references
- Check module configuration in Configuration → System Settings → Module Settings
- Enable debug mode to see specific error messages:
$display_errors = "1";inconfiguration.php - Verify all module dependencies (server modules, API connections) are configured for staging
Comparative Analysis: Staging Setup Methods
| Method | Difficulty | Time Required | Best For | Pros | Cons |
|---|---|---|---|---|---|
| cPanel File Manager + phpMyAdmin | Beginner | 30-45 min | Shared hosting users | No technical skills required, visual interface | Slower for large installations |
| SSH + Command Line | Intermediate | 15-30 min | VPS/dedicated servers | Faster, more control, scriptable | Requires SSH access and CLI knowledge |
| One-Click Staging (Hosting Provider) | Beginner | 5-10 min | Providers with built-in tools | Automated, extremely fast | Not all hosts offer this feature |
| Git Version Control | Advanced | 60+ min initial setup | Development teams | Full version history, easy rollbacks | Steep learning curve, requires Git knowledge |
| Docker Container | Advanced | 45-90 min | Local development | Isolated, portable, replicable | Complex setup, requires Docker expertise |
Pros and Cons: WHMCS Staging Environment
What We Loved
- Risk-free testing: Test upgrades, modules, and customizations without any danger to production
- Real data validation: Catch edge cases and compatibility issues using actual customer data
- One free license per production license: No additional cost if you bought directly from WHMCS
- Full feature parity: Development licenses include all production features except Live Chat
- Client approval workflow: Show stakeholders changes before deploying to live environment
- Training environment: Onboard new team members without risk of breaking production
- Parallel development: Test multiple changes simultaneously in separate staging instances
- Faster debugging: Enable detailed error reporting without exposing issues to customers
Areas for Improvement
- Initial setup time investment: 30-60 minutes required for proper configuration
- License restrictions: Must be password-protected or IP-restricted (though this is a security benefit)
- Manual sync required: No built-in way to sync changes from staging to production
- Additional server resources: Staging doubles your WHMCS footprint (files + database)
- Data refresh maintenance: Need to periodically update staging with current production data
- No Live Chat module: Can't fully test Live Chat functionality in staging
- Potential for configuration drift: Staging can get out of sync with production over time
- Reseller customers must purchase: No free option if you bought WHMCS through a reseller
Evolution & Best Practices: WHMCS Staging in 2026
What's New in 2026
WHMCS 9.0 introduced several improvements that make staging environments even more valuable:
AI Domain Namespinning
Test the new AI-powered domain suggestion feature in staging before enabling for customers.
Nexus Cart Experience
Preview the redesigned checkout flow and customize it for your brand in staging.
Enhanced Logging
Detailed invoice logging makes it easier to debug payment issues in staging.
PHP 8.3 Support
Test PHP 8.3 compatibility in staging before upgrading production PHP version.
Industry Best Practices from Top Hosting Companies
🏆 Enterprise-Level Staging Strategy
Large hosting providers typically use this workflow:
- Development: Active code changes and feature development
- Staging: QA testing with production-like data
- Pre-production: Final validation before deployment (optional)
- Production: Live customer environment
While overkill for small operations, even implementing dev + staging provides significant benefits.
Who Should Use a WHMCS Staging Environment?
Best For:
- Hosting companies with 50+ active customers
- Anyone using custom modules or integrations
- Businesses planning major WHMCS version upgrades
- Development teams building custom functionality
- Companies with strict change management policies
- Multi-developer teams needing collaboration environments
Skip If:
- You have fewer than 10 customers (low risk)
- Using completely vanilla WHMCS with no customizations
- Never install third-party modules or themes
- You're comfortable testing directly in production
- Insufficient server resources for duplicate installation
Alternative Approaches: Local Development Environments
For developers who need frequent testing, a local development environment on your computer can complement your remote staging setup.
Local WHMCS Setup with Docker
# Example Docker Compose for local WHMCS
version: '3'
services:
  web:
    image: php:8.2-apache
    ports:
      - "8080:80"
    volumes:
      - ./whmcs:/var/www/html
  db:
    image: mariadb:10.6
    environment:
      MYSQL_ROOT_PASSWORD: rootpass
      MYSQL_DATABASE: whmcs_local
      MYSQL_USER: whmcs
      MYSQL_PASSWORD: whmcspass
Advantages of local development:
- Instant access without internet connection
- Faster iteration for code changes
- No server resource constraints
- Can run multiple versions simultaneously
Limitations:
- Doesn't test server-specific configurations
- May have environment differences from production
- Can't test email delivery or external integrations
- Not accessible to non-technical team members
Cost Analysis: Is Staging Worth It?
| Cost Item | Amount | Frequency | Notes |
|---|---|---|---|
| Development license | $0-25/mo | Monthly | Free if you own direct license, $15-25 from resellers |
| Additional server resources | $0-50/mo | Monthly | May require upgraded hosting plan for space/bandwidth |
| Initial setup time | $100-300 | One-time | 30-60 minutes at $200/hr developer rate |
| Maintenance (data refresh) | $50-100 | Quarterly | 15-30 minutes per refresh |
| Total Year 1 Cost | $300-1,100 | – | Includes setup + one year operation |
Compare this to the cost of production downtime:
- 4 hours of downtime at $100/hour lost revenue = $400
- Customer churn from poor experience = $500-5,000+
- Emergency support costs = $200-1,000
- Reputation damage = Incalculable
Break-even point: Preventing just ONE production incident typically pays for an entire year of staging environment costs.
🎯 Set Up Your Staging Environment NowFinal Verdict: Is a WHMCS Staging Environment Essential?
After setting up and managing WHMCS staging environments for over 15 years, I can confidently say this: if you have more than 50 active customers or use any custom modules, a staging environment isn't optional—it's essential.
The Bottom Line
The investment required—30 to 60 minutes of setup time and potentially $0-300 in annual costs—is negligible compared to the protection it provides. I've seen staging environments prevent disasters ranging from minor inconveniences (broken invoice templates) to catastrophic failures (database corruption during failed upgrades).
✓ You Should Definitely Set Up Staging If:
- You have 50+ active customers who depend on your services
- Your WHMCS installation uses custom modules, themes, or integrations
- You plan to upgrade to a new major version of WHMCS
- You're developing any custom functionality for WHMCS
- Your business can't afford even 30 minutes of unplanned downtime
- You have multiple team members making changes to WHMCS
⚠️ You Can Probably Skip Staging If:
- You're running a hobby project with fewer than 10 customers
- You use completely vanilla WHMCS with zero customizations
- You never install third-party modules or themes
- You're comfortable with the risk of testing in production
- Your hosting plan doesn't have resources for a duplicate installation
My Personal Recommendation
If you're reading this guide, you're already considering a staging environment—which means you probably need one. The fact that you're thinking about protecting your production environment shows professional maturity that will serve your business well.
Start simple: follow the step-by-step guide above to set up a basic staging environment this week. You don't need to implement all the advanced features immediately. Just having a safe place to test updates and modules will immediately reduce your risk profile.
As you grow more comfortable with staging, you can implement advanced workflows like automated deployments, Git version control, and multi-tier environments. But even the basic setup will pay for itself the first time it catches a breaking change before it reaches your customers.
Where to Get Your WHMCS Development License
Ready to set up your staging environment? Here's where to start:
Free License (Direct Customers)
If you purchased WHMCS directly from WHMCS.com, contact WHMCS Customer Service to request your free development license.
Purchase License (Reseller Customers)
Contact your WHMCS reseller or purchase directly through the WHMCS Members Area. Prices typically $15-25/month.
Official Documentation
Reference the WHMCS Documentation for detailed technical specifications and troubleshooting.
Community Support
Join the WHMCS Community Forums to get help from experienced users and share staging environment tips.
Evidence & Real-World Results
Copying WHMCS files via cPanel File Manager for staging setup
Take Action Today: Your Staging Environment Checklist
Ready to implement your WHMCS staging environment? Follow this checklist:
Request Development License
Contact WHMCS Customer Service or your reseller to obtain your development license. Have your target domain, IP, and directory path ready.
Prepare Server Space
Ensure you have adequate disk space (2x current WHMCS size) and verify PHP/MySQL versions match production.
Clone Files and Database
Use cPanel File Manager to copy your WHMCS directory, then export/import your database to a new staging database.
Update Configuration
Modify configuration.php with staging database credentials and invalidate the encryption hash for security.
Secure the Environment
Password-protect the staging directory and disable email sending to prevent customer communications.
Test Thoroughly
Verify admin and client area access, test order placement, and confirm no emails are being sent.
Document the Process
Create a team wiki or document with your staging URL, credentials, and deployment procedures.
📥 Want This Checklist as a PDF?
Bookmark this guide for future reference, or print it out to follow step-by-step during your staging environment setup. Every step is designed to be actionable and beginner-friendly.
Free for direct WHMCS.com license holders | Set up in under 60 minutes