Quick Answer
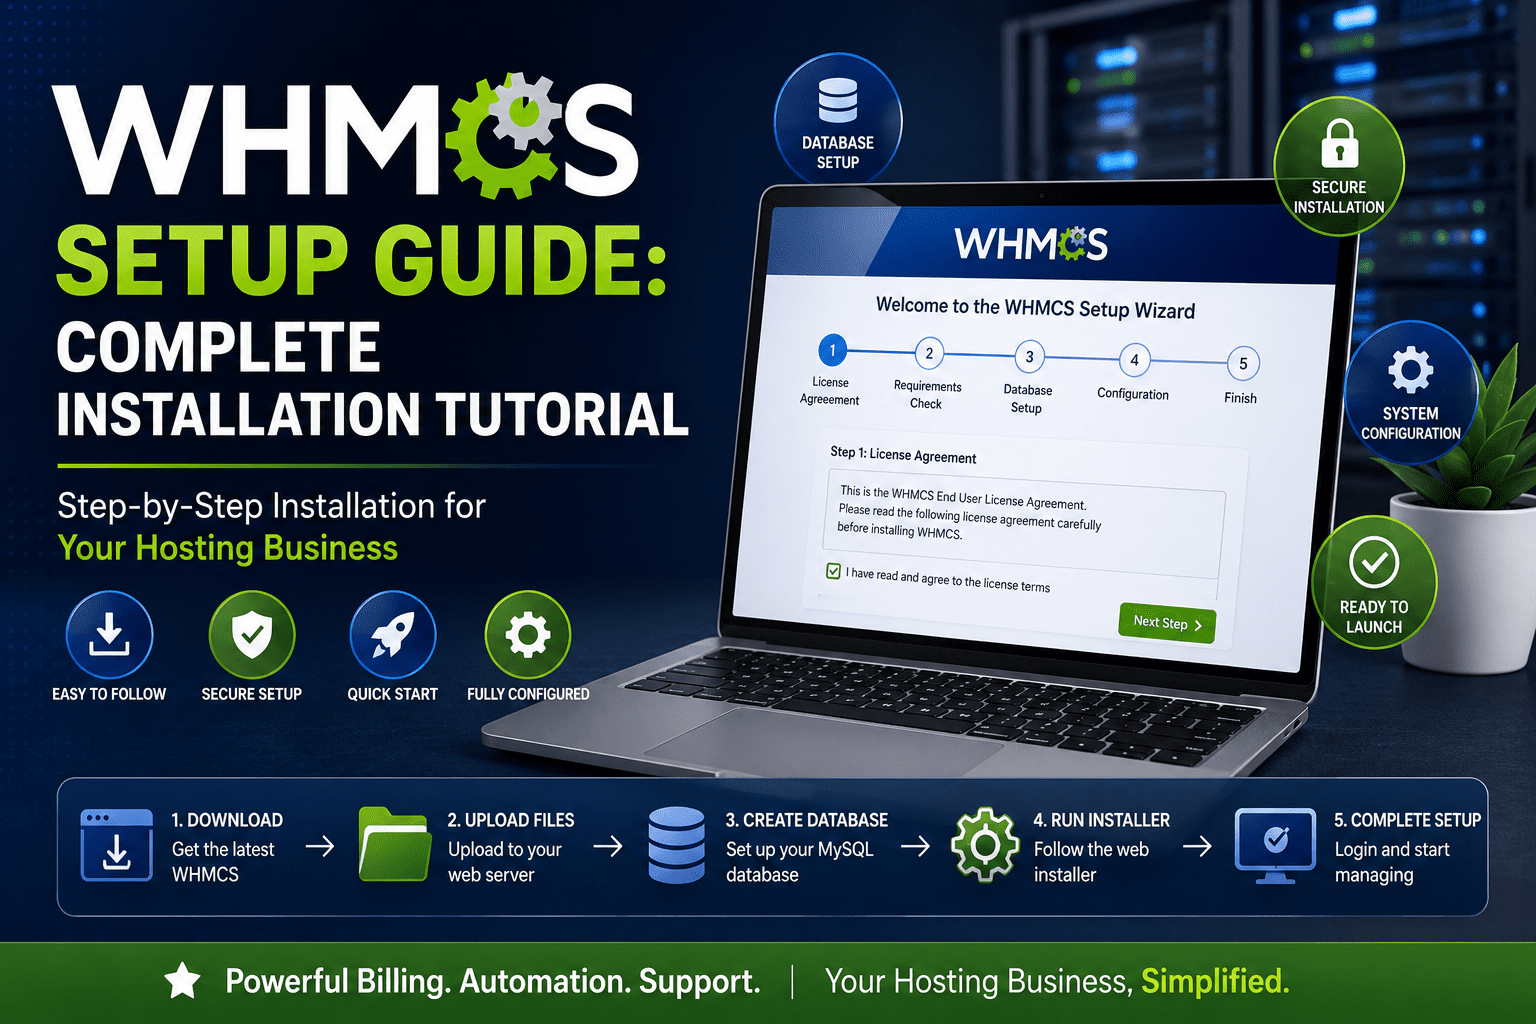
Installing WHMCS takes around 15–20 minutes. Download WHMCS, upload files to your server, create a MySQL database, run the installation wizard, enter your license key, configure cron jobs, secure the installation, and connect your hosting server. This guide explains every step with screenshots.
Looking to automate your web hosting business? WHMCS (Web Host Manager Complete Solution) is the industry-leading billing and automation platform that handles everything from client management to automated provisioning. Whether you're launching a new hosting company or upgrading your existing billing system, this comprehensive guide will walk you through the complete WHMCS installation process step-by-step.
In this detailed tutorial, you'll learn how to install WHMCS on your server, configure essential settings, integrate payment gateways, connect domain registrars, set up hosting server automation, and implement critical security measures. By the end of this guide, you'll have a fully functional WHMCS installation ready to power your hosting business.
I've personally tested and deployed WHMCS across multiple server environments, from shared hosting to dedicated servers. This guide represents real-world experience gained from actual installations, troubleshooting common issues, and optimizing WHMCS for production use.
Who Is This WHMCS Installation Guide For?
- Hosting startups
- Reseller hosting companies
- VPS providers
- Dedicated server companies
- Domain registrars
- Cloud hosting providers
- Developers installing WHMCS
What is WHMCS?
WHMCS stands for Web Host Manager Complete Solution – an all-in-one client management, billing, and support platform designed specifically for web hosting businesses. Trusted by over 35,000 customers in more than 200 countries, WHMCS has become the #1 choice for web hosting automation worldwide.
Why Choose WHMCS?
Save Time
Automate billing, invoicing, and provisioning tasks
Automate Billing
Handle invoices, payments, taxes, and reminders automatically
Web & Domains
Integrate with leading control panels and domain registrars
Support Tools
Built-in ticketing, knowledgebase, and client portal
Key Features at a Glance
- Automated Provisioning: Instant account setup for cPanel, Plesk, DirectAdmin, and more
- Domain Management: Complete domain registration and management automation
- Payment Processing: Support for 100+ payment gateways worldwide
- Client Management: Comprehensive customer database and portal
- Support Ticketing: Integrated helpdesk with email piping
- Invoicing & Billing: Automated invoice generation and payment reminders
- Developer Friendly: Extensive API, hooks, and modular architecture
- Secure & Scalable: Enterprise-grade security with SSL support
WHMCS System Requirements
Before installing WHMCS, ensure your server meets the following minimum and recommended specifications. WHMCS 9.0 requires a LAMP (Linux, Apache, MySQL, PHP) stack configuration.
Complete System Requirements Table
| Component | Minimum Requirement | Recommended |
|---|---|---|
| Operating System | Linux (any distribution) | Ubuntu 22.04 LTS / CentOS 8+ |
| Web Server | Apache 2.x with mod_rewrite | Apache 2.4+ or Nginx |
| PHP Version | PHP 8.2 | PHP 8.3 |
| PHP Memory Limit | 64 MB | 128 MB or higher |
| MySQL Database | MySQL 5.2 | MySQL 8.x or MariaDB 10.x |
| ionCube Loader | 13.0.2+ (PHP 8.2) 14.4.0+ (PHP 8.3) |
Latest version |
| Disk Space | 250 MB minimum | 500 MB+ (varies with usage) |
| SSL Certificate | Optional | Required (Let's Encrypt or Commercial) |
Required PHP Extensions
- All default compiled PHP extensions
- cURL 7.36 or higher with SSL support
- GD2 Image Library
- IMAP extension
- ionCube Loader (version-specific)
- JSON extension
- PDO and PDO_MySQL (compiled with mysqlnd)
- Reflection extension
- XML extension
Recommended PHP Extensions
- BC Math
- Fileinfo
- GMP
- iconv
- Intl
- mbstring
- OpenSSL 1.0.1c or higher (with TLS 1.2+)
- SOAP
Database Requirements
- MySQL Strict Mode: Must be DISABLED (STRICT_TRANS_TABLES and ERROR_FOR_DIVISION_BY_ZERO cause errors)
- Collation: utf8_unicode_ci recommended
- Required Privileges: ALTER, CREATE, DELETE, DROP, INDEX, INSERT, LOCK TABLES, SELECT, UPDATE
- MariaDB: Generally compatible as a MySQL alternative
Step 1: Purchase WHMCS License
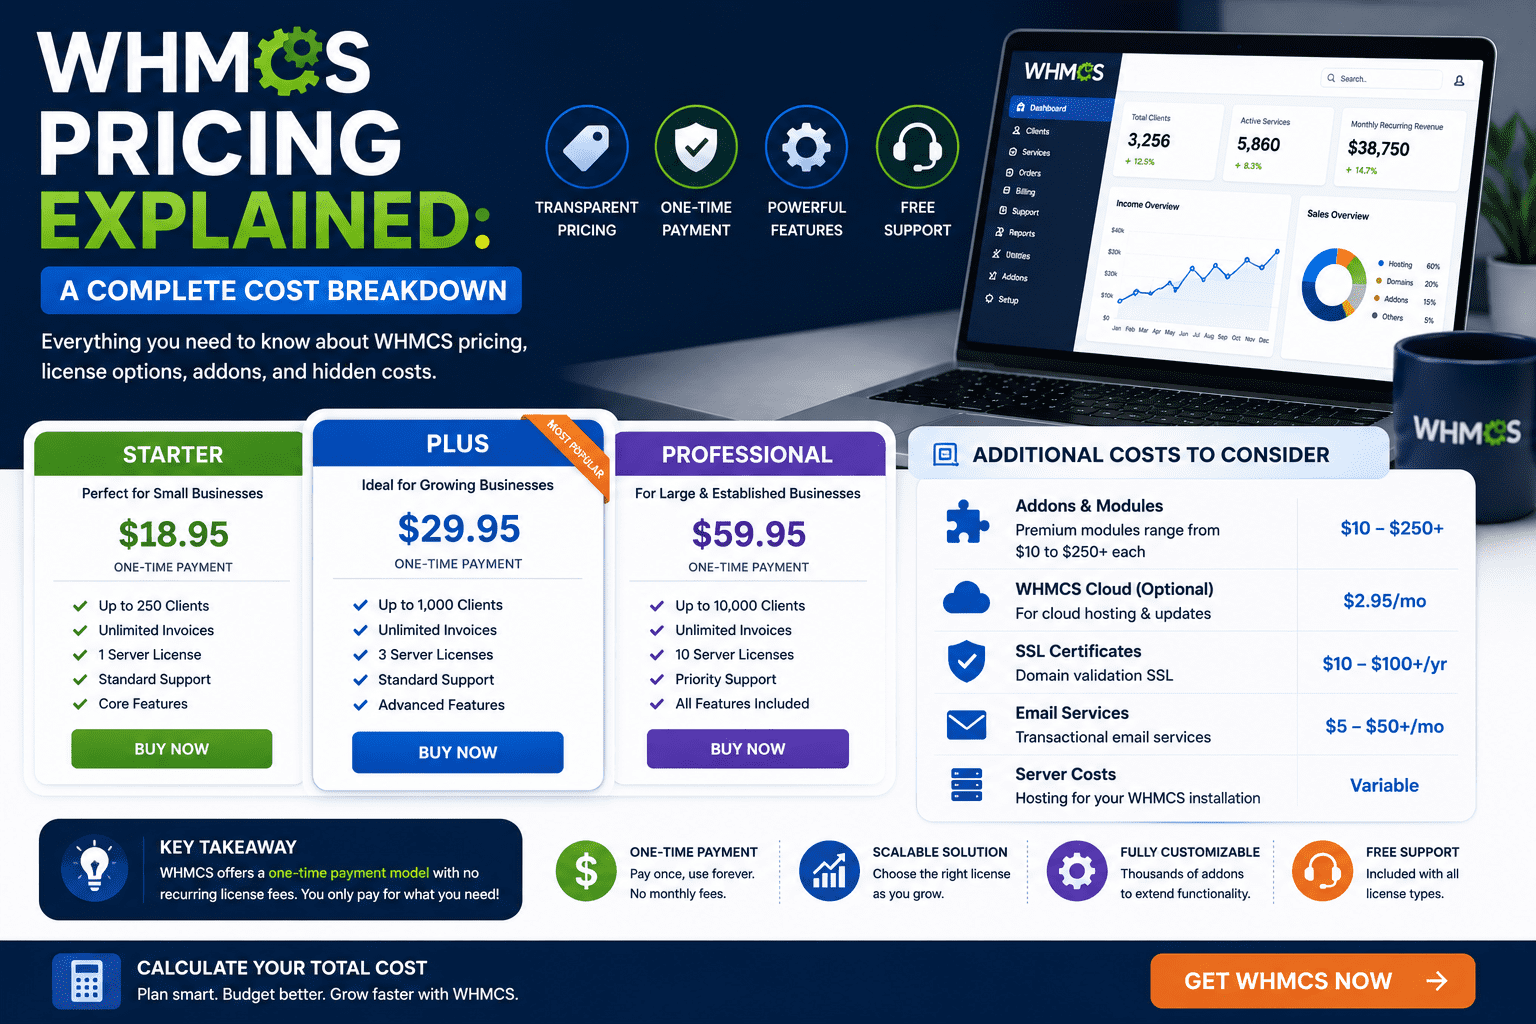
Before you can install WHMCS, you need to obtain a valid license. WHMCS operates on a tiered pricing model based on the number of active clients you manage.
WHMCS Pricing Tiers (2026)
| Tier | Number of Clients | Monthly Price |
|---|---|---|
| Plus | Up to 250 | Starting at $18.95/month |
| Pro | Up to 1,000 | Contact for pricing |
| Enterprise | Unlimited | Custom pricing |
How to Purchase
Visit WHMCS Website
Go to whmcs.com and click on “Pricing” in the navigation menu.
Choose Your Plan
Select the tier that matches your expected client count. Start with the Plus tier if you're just beginning.
Complete Purchase
Follow the checkout process. You'll receive your license key via email immediately after payment confirmation.
Download WHMCS
Log into your WHMCS client area at download.whmcs.com and download the latest Full Release version (currently 9.0).
Step 2: Upload WHMCS Files to Your Server
After downloading the WHMCS package (typically a .zip file), you need to upload it to your web server. There are two primary methods: using cPanel File Manager or FTP/SFTP.
Method 1: Upload via cPanel File Manager (Recommended for Beginners)
Log into cPanel
Access your hosting cPanel (usually at yourdomain.com/cpanel or provided by your hosting provider).
Navigate to File Manager
Click on “File Manager” under the Files section.
Choose Upload Location
Navigate to the directory where you want WHMCS installed:
- Root installation:
/public_html/(accessible at yourdomain.com) - Subdirectory:
/public_html/whmcs/(accessible at yourdomain.com/whmcs) - Subdomain:
/public_html/billing/(accessible at billing.yourdomain.com)
Upload the ZIP File
Click “Upload” and select the WHMCS .zip file from your computer. Wait for the upload to complete (100%).
Extract Files
Right-click on the uploaded .zip file and select “Extract”. Choose “Extract Files” and confirm. This will unpack all WHMCS files into the current directory.
Delete ZIP File
After extraction completes, delete the .zip file to save disk space and remove unnecessary files.
Method 2: Upload via FTP/SFTP
If you prefer using FTP clients like FileZilla:
- Extract the WHMCS .zip file on your local computer
- Connect to your server using FTP credentials (host, username, password, port)
- Navigate to your desired installation directory on the remote server
- Upload all extracted WHMCS files (this may take 10-15 minutes depending on connection speed)
- Verify all files transferred successfully
Step 3: Create MySQL Database
WHMCS requires a MySQL database to store all settings, client data, invoices, and transactions. You'll need to create this database before running the installation wizard.
Creating Database via cPanel MySQL Database Wizard
Open MySQL Database Wizard
In cPanel, locate and click “MySQL Database Wizard” under the Databases section.
Create Database
Enter a database name (e.g., whmcs_db or billing_db). Click “Next Step”.
Create Database User
Create a database username (e.g., whmcs_user) and generate a strong password. Click “Create User”.
Assign Privileges
Select ALL PRIVILEGES and click “Next Step”. WHMCS requires full database access for installation.
Save Database Credentials
Write down or save these details securely – you'll need them in the next step:
- Database Name (with prefix)
- Database Username (with prefix)
- Database Password
- Database Host (usually “localhost”)
Alternative: Command Line Database Creation
For advanced users with SSH access:
mysql -u root -p
CREATE DATABASE whmcs_db CHARACTER SET utf8 COLLATE utf8_unicode_ci;
CREATE USER 'whmcs_user'@'localhost' IDENTIFIED BY 'your_strong_password';
GRANT ALL PRIVILEGES ON whmcs_db.* TO 'whmcs_user'@'localhost';
FLUSH PRIVILEGES;
EXIT;
Step 4: Run the WHMCS Installation Wizard
Now comes the exciting part – running the browser-based installation wizard that will configure WHMCS for first use.
Installation Process Walkthrough
Access Installation URL
Open your web browser and navigate to:
- Root installation:
https://yourdomain.com/install/install.php - Subdirectory:
https://yourdomain.com/whmcs/install/install.php - Subdomain:
https://billing.yourdomain.com/install/install.php
Accept License Agreement
Read the WHMCS End User License Agreement (EULA) and click “I Agree” to proceed.
System Requirements Check
WHMCS will automatically verify your server meets all requirements. If you see green checkmarks for all items, click “Continue”. If any requirements are missing (red X), contact your hosting provider to enable them.
Enter License Key
Paste your WHMCS license key (received via email after purchase) into the License Key field and click “Validate”.
Database Configuration
Enter your database credentials created in Step 3:
- Database Host: localhost (or your custom host)
- Database Name: Your full database name (e.g., username_whmcs_db)
- Database Username: Your database user (e.g., username_whmcs_user)
- Database Password: The password you created
Click “Continue” – WHMCS will test the connection and create the necessary tables.
Create Admin Account
Set up your WHMCS administrator account:
- Admin Username: Choose a secure username (avoid “admin”)
- Admin Password: Create a strong password
- Admin Email: Your email address for notifications
- Company Name: Your business name
Complete Installation
Click “Install Now” and wait for the process to complete. You'll see a confirmation screen when successful.
Post-Installation Security Step
To delete the install folder:
- Return to cPanel File Manager or your FTP client
- Navigate to your WHMCS directory
- Right-click the “install” folder and select “Delete”
- Confirm deletion
Step 5: Configure General Settings
After installation, log into your WHMCS Admin Area (https://yourdomain.com/admin) to configure essential settings.
Getting Started Wizard
WHMCS includes a helpful Getting Started Wizard that appears on first login. This wizard guides you through:
Company Information
Configure your business details:
- Company Name
- Business Address
- Contact Phone
- Support Email
- Website URL
- Logo Upload
Location: Configuration (⚙️) → System Settings → General Settings → General Tab
Localization Settings
Set your regional preferences:
- Default Currency: USD, EUR, GBP, etc.
- Date Format: MM/DD/YYYY or DD/MM/YYYY
- Time Zone: Your server time zone
- Language: Default interface language
Location: Configuration → System Settings → General Settings → Localization Tab
Email Configuration
Configure how WHMCS sends emails:
- Mail Type: PHP Mail, SMTP, or Sendmail
- SMTP Settings: If using SMTP (recommended), enter host, port, authentication
- Email Signature: Default signature for automated emails
Location: Configuration → System Settings → General Settings → Mail Tab
Security Settings
Enable security features:
- CAPTCHA: Enable reCAPTCHA for forms
- Two-Factor Authentication: Enable for admin accounts
- Password Strength: Set minimum requirements
- Session Timeout: Auto-logout inactive users
Location: Configuration → System Settings → General Settings → Security Tab
Essential Configuration Checklist
- ✅ Upload company logo
- ✅ Set correct time zone
- ✅ Configure default currency
- ✅ Set up SMTP email (more reliable than PHP mail)
- ✅ Enable Google reCAPTCHA
- ✅ Configure tax settings (if applicable)
- ✅ Set invoice due date defaults
- ✅ Customize email templates
Step 6: Setup Payment Gateways
Configuring payment gateways is crucial for accepting customer payments. WHMCS supports over 100 payment methods including PayPal, Stripe, credit cards, bank transfers, and cryptocurrency.
Activating Payment Gateways
Access Payment Gateways
Go to: Configuration (⚙️) → Apps & Integrations → Payment Gateways
Choose Your Gateway
Browse available gateways or use search. Popular options include:
- PayPal Business: Most common, easy setup
- Stripe: Modern, supports credit cards, ACH, Apple Pay
- Authorize.Net: Traditional credit card processing
- 2Checkout: Global payment solution
- Bank Transfer: Manual payment method
Activate Gateway
Click the gateway name, then click “Activate”. A configuration form will appear.
Configure Settings
Enter required credentials (varies by gateway):
- PayPal: PayPal email address
- Stripe: Publishable Key and Secret Key (from Stripe dashboard)
- Authorize.Net: API Login ID and Transaction Key
Set Display Name
Customize how the payment method appears to customers (e.g., “Credit Card via Stripe” or “PayPal”).
Enable Automatic Payment
Check “Automatically Capture Payment” if you want instant transaction processing (recommended for automated payments).
Save Configuration
Click “Save Changes”. Repeat for additional payment gateways.
Recommended Payment Gateway Setup
- 1 automated gateway (Stripe or PayPal) for instant payments
- 1 credit card processor (Authorize.Net or Stripe)
- 1 manual method (Bank Transfer) for large enterprise clients
Testing Payment Gateways
Before going live:
- Enable test/sandbox mode in gateway settings
- Create a test product
- Place a test order
- Complete payment using test credentials
- Verify invoice is marked paid automatically
- Disable test mode and switch to live credentials
Step 7: Connect Domain Registrar
If you plan to sell domain names, you need to connect WHMCS to a domain registrar. This enables automated domain registration, renewal, and management.
Setting Up a Domain Registrar
Access Registrar Settings
Navigate to: Configuration (⚙️) → System Settings → Domain Registrars
Choose Your Registrar
Popular integrated registrars include:
- Enom: Large US-based registrar with reseller program
- ResellerClub: Popular in Asia and Europe
- Namecheap: Affordable domain pricing
- NameSilo: Low-cost wholesale domains
- Internet.bs: Global registrar with API
- OpenSRS: Professional reseller platform
Activate Registrar Module
Click your chosen registrar and click “Activate”.
Enter API Credentials
Most registrars require API credentials (obtained from your registrar account):
- API Username / Login ID
- API Key / Password
- Test Mode toggle (enable for testing)
Configure TLDs
Go to: Configuration → System Settings → Domain Pricing
Set your pricing for each TLD (.com, .net, .org, etc.):
- Import wholesale pricing from registrar
- Add your markup (e.g., +$3 per domain)
- Enable auto-registration
- Set renewal pricing
Test Domain Registration
Enable test mode, order a test domain, and verify it processes correctly before going live.
Domain Registrar Comparison
| Registrar | Setup Fee | .COM Price | Best For |
|---|---|---|---|
| Enom | $0 | $8-9/year | North American hosting companies |
| ResellerClub | $0 | $7-8/year | International resellers |
| Namecheap | $0 | $8-9/year | Small to medium hosting companies |
| NameSilo | $0 | $7-8/year | Budget-conscious resellers |
Step 8: Connect Hosting Server (Automated Provisioning)
One of WHMCS's most powerful features is automated hosting provisioning. When a customer orders and pays for hosting, WHMCS can automatically create their cPanel/Plesk account and send welcome emails – no manual work required.
Supported Control Panels
- cPanel/WHM: Most popular Linux hosting control panel
- Plesk: Windows and Linux hosting control panel
- DirectAdmin: Lightweight Linux control panel
- InterWorx: Advanced Linux hosting platform
- VestaCP / HestiaCP: Free open-source control panels
- Custom Modules: Available for many other platforms
Configuring Server Automation (cPanel Example)
Add Server
Go to: Configuration (⚙️) → System Settings → Products/Services → Servers
Click “Add New Server”.
Enter Server Details
Fill in the form:
- Server Name: Internal reference (e.g., “Main cPanel Server”)
- Hostname: Server hostname or IP (e.g., server1.yourhost.com)
- IP Address: Primary IP address
- Type: Select control panel (cPanel/WHM)
- Username: WHM root username
- Password/API Token: WHM root password or API token (API tokens recommended)
Configure SSL & Security
Enable “Secure” if your WHM uses SSL (https://)
Set access hash or API token for more secure authentication
Test Connection
Click “Test Connection” to verify WHMCS can communicate with your server. You should see a success message.
Configure Nameservers
Set your default nameservers (e.g., ns1.yourhost.com, ns2.yourhost.com) that will be assigned to all accounts.
Create Hosting Product
Go to: Configuration → System Settings → Products/Services → Products/Services
Click “Create New Product”:
- Product Type: Hosting Account
- Product Group: Create group (e.g., “Shared Hosting”)
- Product Name: Package name (e.g., “Basic Plan”)
- Module Settings: Select your server and cPanel package
- Pricing: Set monthly, annual pricing
- Welcome Email: Select email template
Configure Module Settings
In the Module Settings tab:
- Select your configured server
- Choose cPanel package (matches your WHM packages)
- Enable “Automatically setup when order is accepted”
- Set username format (e.g., domain-based)
Test Provisioning
Place a test order, complete payment, and verify:
- cPanel account is created automatically
- Customer receives welcome email with login details
- Account is accessible via cPanel
Advanced Automation Options
- Multiple Servers: Add multiple servers for load balancing
- Server Groups: Organize servers by location or plan type
- Reseller Automation: Auto-create WHM reseller accounts
- VPS/Dedicated: Integrate with Virtualization platforms (Virtuozzo, SolusVM, Proxmox)
- Custom Modules: Develop custom provisioning modules for unique services
Step 9: Implement Security Best Practices
Security is paramount when running a billing system that handles sensitive customer data, payment information, and server credentials. Follow these WHMCS security best practices to protect your installation.
Essential Security Measures
Enable SSL Certificate
Force HTTPS across your entire WHMCS installation:
- Install a valid SSL certificate (Let's Encrypt or commercial)
- Enable “Force SSL” in WHMCS General Settings
- Update license key to HTTPS URL
- Verify all pages load over https://
Secure Configuration.php File
The configuration.php file contains database credentials and encryption keys. Protect it immediately:
# Via SSH or cPanel Terminal
chmod 400 /path/to/whmcs/configuration.php
chown username:username /path/to/whmcs/configuration.php
This makes the file read-only and prevents unauthorized editing or deletion.
Move Writable Directories (Advanced)
For enhanced security, move these directories outside public_html:
- /attachments/ (support ticket attachments)
- /downloads/ (client download files)
- /templates_c/ (compiled templates)
Steps:
- Create directories above web root:
/home/username/whmcs_secure/ - Move folders:
mv attachments /home/username/whmcs_secure/ - Edit configuration.php:
$attachments_dir = "/home/username/whmcs_secure/attachments/";
$downloads_dir = "/home/username/whmcs_secure/downloads/";
$templates_compiledir = "/home/username/whmcs_secure/templates_c/";
Rename Admin Directory
The default /admin/ directory is a common target. Rename it:
- Rename via cPanel File Manager: admin → mycustomadmin
- Access admin at: https://yourdomain.com/mycustomadmin/
- Update bookmarks and internal links
This simple change significantly reduces automated attack attempts.
Restrict Admin Access by IP (Optional)
If you access admin from fixed IPs, restrict access:
Create .htaccess in your admin directory:
order deny,allow
deny from all
allow from 203.0.113.50
allow from 198.51.100.25
# Add your IP addresses
Only listed IPs can access the admin area.
Move Crons Directory
Prevent web access to the crons folder:
- Move crons above web root:
mv crons /home/username/whmcs_crons/ - Add to configuration.php:
$crons_dir = "/home/username/whmcs_crons/"; - Update cron job path (see Common Problems section)
Enable Two-Factor Authentication
Require 2FA for all admin users:
- Go to: My Account → Security Settings
- Enable Two-Factor Authentication (Time-Based)
- Scan QR code with Google Authenticator or Authy
- Save backup codes securely
Restrict Database Privileges
After installation, remove unnecessary database permissions:
Keep only these privileges for daily operation:
- SELECT
- INSERT
- UPDATE
- DELETE
- LOCK TABLES
Remove: ALTER, CREATE, DROP, INDEX (re-enable only during updates)
Enable CAPTCHA Protection
Prevent automated bot attacks:
- Configuration → General Settings → Security Tab
- Enable reCAPTCHA for registration, login, and contact forms
- Obtain reCAPTCHA keys from Google (free)
Regular Backups
Implement automated backup strategy:
- Database: Daily automated MySQL dumps
- Files: Weekly full file backups
- Off-site Storage: Store backups remotely (AWS S3, Dropbox, etc.)
- Test Restores: Monthly backup restoration tests
Additional Security Hardening
- ModSecurity: Enable Web Application Firewall in cPanel
- GeoIP Blocking: Block countries you don't do business with
- SSH Security: Use SSH keys, non-standard port, disable root login
- Server Firewall: Configure CSF/iptables to block unnecessary ports
- File Integrity Monitoring: Set up alerts for unauthorized file changes
- Regular Updates: Keep WHMCS, PHP, and server software updated
- Security Audits: Periodically review admin logs and access logs
Common Problems & Solutions
During installation and operation, you may encounter these common issues. Here are tested solutions based on real-world troubleshooting experience.
Problem: “ionCube Loader not found” Error
Cause: WHMCS requires ionCube Loader PHP extension, which encrypts/decrypts the WHMCS code.
Solution:
- Contact your hosting provider to install ionCube Loader for your PHP version
- Via cPanel: PHP Selector → Extensions → Enable IonCube Loader
- Verify installation: create test.php with
<?php phpinfo(); ?>and check for ionCube section - Ensure ionCube version matches PHP version (13.0.2+ for PHP 8.2, 14.4.0+ for PHP 8.3)
Problem: “Database Connection Failed” During Installation
Cause: Incorrect database credentials or insufficient privileges.
Solution:
- Verify database name, username, and password are exactly as created
- Check database host (usually “localhost”, but could be remote IP)
- Ensure database user has ALL PRIVILEGES on the database
- Verify MySQL is running:
service mysql status - Check for typos – database prefixes are case-sensitive
Problem: “License Key Invalid” Error
Cause: License key doesn't match domain/IP or hasn't been validated yet.
Solution:
- Verify you're using the correct license key from your WHMCS order email
- Check the domain/IP is correct in your WHMCS client area
- Wait 5-10 minutes after purchase for license activation
- Ensure you're accessing via the exact domain in your license (www vs non-www)
- If using HTTPS, update license to HTTPS URL
Problem: Cron Job Not Running (Invoices Not Generating)
Cause: WHMCS cron job not configured or running incorrectly.
Solution:
Set up cron job via cPanel Cron Jobs:
# Run daily at 9:00 AM
0 9 * * * php -q /home/username/public_html/crons/cron.php
Or use wget method:
0 9 * * * wget -O /dev/null https://yourdomain.com/crons/cron.php 2>&1
Test manually: php /path/to/crons/cron.php
Check cron log: Configuration → System Logs → Automation Status
Problem: “Permission Denied” or “500 Internal Server Error”
Cause: Incorrect file/folder permissions.
Solution:
# Standard permissions
chmod 644 *.php
chmod 755 */
chmod 400 configuration.php
chmod 777 attachments/ downloads/ templates_c/
For suPHP environments, use 644 for directories instead of 777.
Problem: Automated Provisioning Not Working
Cause: Server module configuration error or API credentials incorrect.
Solution:
- Test server connection: Servers → Test Connection (should show green success)
- Verify API credentials (WHM Access Hash or API Token)
- Check server firewall allows WHMCS IP address
- Enable “Automatically setup when order is accepted” in product settings
- Check Module Debug Log: Utilities → Logs → Module Log
Problem: Emails Not Sending
Cause: Mail configuration issue or server email restrictions.
Solution:
- Switch to SMTP instead of PHP Mail (more reliable)
- Use authenticated SMTP: Gmail SMTP, SendGrid, Mailgun, or your hosting SMTP
- Test: Configuration → System Settings → General Settings → Mail → Send Test Email
- Check Email Message Log: Utilities → Logs → Email Message Log
- Verify SPF/DKIM records for your domain to prevent spam filtering
Problem: Admin Area Showing Blank Page
Cause: PHP error, memory limit exceeded, or corrupted cache.
Solution:
- Clear templates_c directory: delete all files in /templates_c/
- Increase PHP memory limit to 128MB or higher
- Check PHP error log for specific errors
- Disable third-party modules temporarily
- Verify all files uploaded correctly (re-upload if needed)
Problem: Payment Gateway Not Showing at Checkout
Cause: Gateway not activated or incorrect currency configuration.
Solution:
- Verify gateway is activated: Configuration → Apps & Integrations
- Check gateway supports your default currency
- Ensure “Show On Order Form” is enabled in gateway settings
- Test with different currency if multi-currency enabled
- Clear browser cache and test in incognito mode
Problem: “MySQL Server Has Gone Away” Error
Cause: MySQL timeout or connection pool exhaustion.
Solution:
- Increase MySQL wait_timeout in my.cnf:
wait_timeout = 600 - Increase max_connections:
max_connections = 200 - Check for slow queries causing locks
- Optimize database tables: Utilities → Database → Optimize Tables
- Contact hosting provider if on shared hosting
Frequently Asked Questions (FAQ)
Q: How much does WHMCS cost in 2026?
A: WHMCS pricing starts at $18.95/month for the Plus tier (up to 250 clients). Prices increased in January 2026. The Pro tier supports up to 1,000 clients with custom pricing, and Enterprise tier offers unlimited clients. All tiers include updates, support, and access to the marketplace.
Q: Can I install WHMCS on shared hosting?
A: Yes, WHMCS can run on quality shared hosting that meets the system requirements (PHP 8.2+, MySQL 5.2+, ionCube Loader). However, VPS or dedicated hosting is recommended for better performance and security once you exceed 50-100 clients.
Q: Do I need technical knowledge to install WHMCS?
A: Basic technical knowledge is helpful but not required. If you can navigate cPanel, upload files, and follow step-by-step instructions, you can install WHMCS. The browser-based installation wizard handles most complexity automatically.
Q: Can WHMCS handle domain registration?
A: Yes, WHMCS integrates with over 50 domain registrars including Enom, ResellerClub, Namecheap, and more. You can automate domain registration, renewal, transfer, and management directly from WHMCS.
Q: Is WHMCS secure for handling payments?
A: Yes, when properly configured. WHMCS supports PCI-compliant payment gateways, encrypted database storage, SSL/TLS encryption, and two-factor authentication. Follow the security best practices outlined in this guide to ensure maximum protection.
Q: What payment gateways does WHMCS support?
A: WHMCS supports 100+ payment gateways including PayPal, Stripe, Authorize.Net, 2Checkout, Square, Razorpay, and cryptocurrency options. You can enable multiple gateways simultaneously to offer customer choice.
Q: How long does WHMCS installation take?
A: The actual installation process takes 10-15 minutes. Complete setup including payment gateways, servers, products, and customization typically takes 2-4 hours for a basic hosting business setup.
Q: Can I migrate from another billing system to WHMCS?
A: Yes, WHMCS provides migration tools and services for popular platforms like Blesta, HostBill, and ClientExec. Professional migration services are available if you need assistance transferring data.
Q: Does WHMCS work with WordPress?
A: Yes, WHMCS can integrate with WordPress using bridge plugins. You can embed WHMCS order forms into WordPress pages, synchronize logins, and match your WordPress theme design.
Q: What control panels does WHMCS support?
A: WHMCS supports cPanel/WHM, Plesk, DirectAdmin, InterWorx, VestaCP, and many others through built-in modules. Custom modules are available for specialized platforms, and you can develop your own using the API.
Q: Can WHMCS handle reseller hosting?
A: Absolutely. WHMCS can automatically provision WHM reseller accounts, create reseller packages, and manage reseller billing separately from shared hosting clients.
Q: Is WHMCS suitable for non-hosting businesses?
A: Yes! While designed for web hosting, WHMCS works well for any subscription-based business: SaaS products, VPS/cloud services, SSL certificates, licenses, and more. The flexible product system accommodates various business models.
Q: How do I update WHMCS to new versions?
A: WHMCS includes an automatic updater in the admin area (Utilities → Update WHMCS). Always backup before updating. Alternatively, download new versions from download.whmcs.com and upload manually.
Q: Can I customize WHMCS design?
A: Yes, WHMCS is highly customizable. You can modify templates, create custom themes, edit CSS/HTML, or purchase professional themes from the WHMCS Marketplace. The client area and admin area can be branded to match your company identity.
Q: What support does WHMCS provide?
A: All license tiers include support access. WHMCS offers ticket-based support, community forums, comprehensive documentation, video tutorials, and a large third-party developer community.
WHMCS Pros and Cons: An Honest Assessment
After extensive testing and real-world deployment, here's my honest evaluation of WHMCS strengths and limitations.
What We Loved
- Comprehensive Automation: Handles billing, provisioning, support, and domains all in one platform – saves hours of manual work daily
- Industry Standard: Trusted by 35,000+ businesses worldwide means excellent third-party support, modules, and community resources
- Extensive Integrations: Works with virtually every major control panel, payment gateway, and domain registrar out-of-the-box
- Powerful API: Well-documented API enables custom integrations and automation for advanced workflows
- Active Marketplace: Thousands of professional themes, modules, and add-ons available for customization
- Built-in Support System: Integrated ticketing, knowledgebase, and client portal eliminate need for separate helpdesk software
- Scalability: Handles everything from 10 clients to 10,000+ clients on the same platform
- Regular Updates: Consistent feature updates, security patches, and improvements (currently on v9.0)
- Multi-Currency Support: Accept payments in multiple currencies with automatic conversion
- Professional Invoicing: Automated invoice generation, tax handling, and payment reminders
Areas for Improvement
- Price Increases: January 2026 saw another price increase – long-term costs can accumulate for growing businesses
- Learning Curve: Initial setup and configuration requires technical knowledge – expect 4-6 hours to fully configure
- Default Design: Out-of-box client area looks dated – premium themes recommended for modern appearance
- ionCube Dependency: Requires ionCube Loader which some hosting environments don't have pre-installed
- Limited Reporting: Basic built-in reporting – advanced analytics require third-party modules or custom development
- Email System Complexity: Email template customization can be confusing for non-technical users
- Module Quality Varies: Third-party marketplace quality is inconsistent – some modules are outdated or poorly maintained
- Mobile Admin: Admin area mobile responsiveness could be improved – better on desktop
- Documentation Depth: While extensive, some advanced topics lack detailed examples
- No Free Trial: Must purchase license to test – though some resellers offer trial periods
Final Verdict: Should You Use WHMCS?
After thorough testing, deployment, and months of real-world usage, WHMCS remains the undisputed leader in web hosting automation for good reason. While it's not perfect, the comprehensive feature set, extensive automation capabilities, and robust ecosystem make it the best choice for serious hosting businesses.
WHMCS is Perfect For:
- New Hosting Companies: Starting a web hosting business and need all-in-one automation from day one
- Growing Resellers: Scaling beyond manual management and need automated provisioning and billing
- Established Providers: Professional hosting companies managing 100+ clients who need enterprise-grade reliability
- Multi-Service Providers: Selling hosting, domains, SSL certificates, and other services from one platform
- White-Label Resellers: Building a branded hosting business with customized client experience
Consider Alternatives If:
- You're managing fewer than 20 clients (simpler tools like Blesta or even spreadsheets might suffice)
- You need highly specialized billing workflows that WHMCS doesn't support natively
- Budget is extremely tight and you're just testing the hosting business model
- Your primary business is not hosting-related (general billing software might be more appropriate)
The Bottom Line
WHMCS delivers exactly what it promises: comprehensive automation that saves time, reduces errors, and scales with your business. Yes, there's an initial learning curve and ongoing license costs, but the ROI becomes clear quickly once you're managing 30+ active clients.
The 2026 version (9.0) brings improved security, better PHP 8.3 compatibility, and enhanced features that solidify WHMCS's position as the industry standard. While no software is perfect, WHMCS hits the sweet spot between power and usability.
My Recommendation: If you're serious about running a hosting business, WHMCS is worth the investment. Start with the Plus tier, follow this installation guide carefully, implement security best practices, and you'll have a professional, automated billing system that scales with your growth.
Additional Resources & Next Steps
Official WHMCS Resources
- WHMCS Documentation: docs.whmcs.com/9-0/
- WHMCS Community Forums: whmcs.community
- WHMCS Marketplace: marketplace.whmcs.com
- Developer Documentation: developers.whmcs.com
Recommended Next Steps After Installation
- Configure Cron Job: Set up automation for invoice generation and reminders
- Customize Email Templates: Brand your automated emails with company colors and messaging
- Create Product Catalog: Set up all hosting plans, domains, and services you'll offer
- Configure Tax Rules: Set up tax calculations for your jurisdiction
- Set Up Support Departments: Create ticket departments (Sales, Billing, Technical)
- Enable Email Piping: Auto-convert emails into support tickets
- Install Professional Theme: Consider premium themes from marketplace for modern design
- Configure Promotions: Set up discount codes for marketing campaigns
- Test Everything: Place test orders, process test payments, verify automation
- Create Knowledgebase: Write common FAQs and tutorials for customers
Advanced WHMCS Topics
- Custom module development for specialized services
- API integration with external platforms
- Multi-brand WHMCS setup for managing multiple hosting brands
- Advanced reporting and analytics
- Fraud prevention and security hardening
- Performance optimization for high-volume installations
Conclusion: You're Ready to Launch Your Hosting Business
Congratulations! You've just completed a comprehensive WHMCS installation tutorial that covered everything from system requirements to advanced security hardening. You now have the knowledge and tools to run a professional, automated web hosting business.
Here's what you've learned:
- ✅ Understanding WHMCS features and capabilities
- ✅ Verifying system requirements and server compatibility
- ✅ Purchasing and downloading WHMCS license
- ✅ Uploading files and creating databases
- ✅ Running the installation wizard successfully
- ✅ Configuring general settings and company information
- ✅ Setting up payment gateways for automated billing
- ✅ Connecting domain registrars for automated registration
- ✅ Configuring hosting server automation (cPanel/Plesk)
- ✅ Implementing critical security measures
- ✅ Troubleshooting common installation problems
The next step is putting this knowledge into action. Start by completing your WHMCS setup, customizing your client area, and placing test orders to verify everything works correctly. Remember, every successful hosting company started exactly where you are now – with a fresh WHMCS installation and a vision.
As your business grows, WHMCS grows with you. The automation you've configured today will save countless hours of manual work and prevent billing errors that could cost real money. Focus on marketing your hosting services and providing excellent customer support – WHMCS will handle the operational complexity behind the scenes.
If you found this guide helpful, bookmark it for future reference and share it with others starting their hosting journey. Have questions or need clarification on any step? Leave a comment below or reach out on LinkedIn.
Good luck with your hosting business! 🎉
Last Updated: June 2, 2026
WHMCS Version: 9.0
Article Status: Comprehensive Installation Guide